
Again, based on discussions in the Viewfinders club…
Once you get to the stage where you get your digital photos onto a computer and start working with “image processors” to make adjustments, a question one often hears is “what should I use – Levels or Curves?”. The Questionner is referring to different types of tool that can be used to adjust the rightness and/or contrast of an image. The Questionee’s standard answer is whatever suits you best”. Which is correct though not necessarily very helpful. I’ll try to elaborate on the difference here, without getting too technical.

All photo processing software tools are equal (though some are more equal then others), but they do tend to use their own names for things or operate in slightly different ways to what’s described below. However, the basic principles are the same, and some experimentation will help along the way (remember, digital bits are very cheap, but keep a safe copy of your original photo in case something goes totally west).
Brightness and Contrast sliders.
Most photo editors have two simple sliders called like this; usually right in your face so you can’t miss them. For a first approach they do what it says on the label (some have “Exposure” sliders as well). It is a bit of a blunt instrument though. You can increase the general “brightness” of the image, a bit like the volume control of a radio – you can make it louder (brighter), or quieter (darker), to taste. But then everything gets louder (or quieter if you turn the knob the other way). A good start but lacking some subtlety sometimes. If the music is quiet you may be tempted to turn the knob up a little more, at which point some hissing may become audible. Much in the same way, a “too dark” (under-exposed) image can be boosted up to the point that “noise” can become visible in the picture too.

To continue the analogy with a radio, the Contrast control is a little like a basic “tone” control found on some simple radios. Moving it changes the general tone of the sound (how the highlights sound), and by analogy, the Contrast slider adjusts how the blacks, greys and highlights are related.
The simplest of adjustments, and usually the first (and, to be honest, quite often the only) “tweak” on a photo.
Levels.
Moving up from a simple radio to a classic home “hi-fi” system, you may well find some extra controls – Bass” and “Treble”, and sometimes even “Mid” knobs to twiddle. Bass adjusts the low-end, darker sounds, treble the high-pitched brighter sounds, and Mid (if present) kinda gets freaky with the middle tones (it’s funny that way).

From our analogy again, the “levels” in your photo software will have one control for the “darks” end, one for the bright end and usually at least one for the mid-greys. And these too do what it says on the label. The Black control will control the level (yes) of the blackest parts of the picture, White the top end, and the mid-point control will let you shift the middle grey tones up (brighter) or down (you got it).
Still not the most accurate of instruments, but it’s certainly very usable.
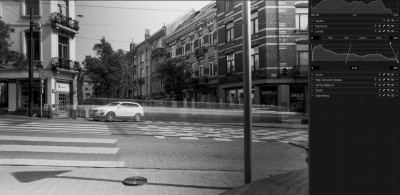
Curves
This is where we go from the normal household hi-fi audio system to something more resembling a professional recording studio. At least as far as the “tone control” goes, this has now become a set of sliders controlling quite well-defined pitches of sound, giving very precise control of the amount of each one in the sound you hear. The knobs are usually sliders which, when lined up next to each other, can look like a nice, graceful curve (so they call them “graphic equalisers”). Yes, you get where we’re going here now, right?

The “Curves” tool in photo processing would probably be rather cumbersome if it had a slider for each level of grey to be adjusted. Instead, they allow you to define the nice-shaped curve (from which they calculate all the intermediate values required), by adding points along the curve that can be pulled up or down as desired.
Normally, curves are used to give fine control of the appearance of the different tonal ranges in the source image. You can boost (push the curve up a bit) or reduce (pull the curve down a bit) at different places along the histogram at will.
Pulling the lows down a bit and pushing the highlights up (or vice-versa) produces a slight “S”-shaped curve, sometimes referred to as a “sigmoid” (just to be geeky, I think), but which is very effective and intuitive for correcting many images taken in “difficult” lighting conditions.
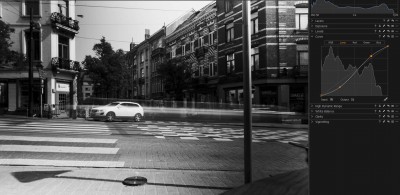
You can also get quite extreme: pushing the “Black” end all the way up to “White” and pulling the White end all the way to Black produces a negative image. Keeping the “White” end at white and pulling down the middle of the curve gives an interesting “solarisation” effect. Experiment, and observe what happens. It’s the only way!


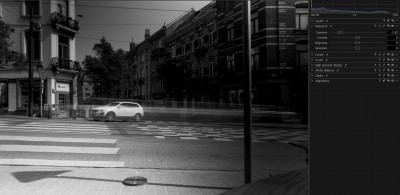
Local adjustment
The above description applies changes to the whole of the image. However, most photo processing tools will allow you to apply any of the above adjustments to specific areas only. Often, a “mask” can be drawn by hand (usually shown as a contrasting colour, so you can see what you’ve done – though this colour itself doesn’t appear in the final image of course). More advanced software will also give you all sorts of tools to help draw very precise masks, fill large areas (e.g. the sky,…), etc. etc… Where the mask is painted, the adjustment will be applied, elsewhere not. This allows you to pick out one problematic part of your picture and correct it (face too much in shadow? Just brighten that bit. Here, I’ve darkened the building facades just to show the point).

Back in the days of “analog” printing, you’d use your hands or bits of card with holes cut out to “dodge and burn” the print (lighten or darken respectively) in certain areas, simply by casting a shadow on part of the print, or only exposing one area of the print for part of the exposure time. Tipping the hat to the pioneers of photography, the terms “dodge and burn” are still in common use in digital photo processing today. Some really good tricks like this will never die, I guess…
